 Save
SavePainting kitchen cabinets is the single highest-impact thing you can do to a kitchen without replacing anything: roughly $150–300 in materials against $3,000–8,000 for refacing or new doors.
It's also the project most likely to end in peeling paint six months later. Not because people buy bad paint — because they skip the two steps that make paint stick to a surface covered in years of cooking grease and factory gloss.
The honest answer about "no sanding"
You'll find plenty of tutorials promising cabinets painted without sanding. It can work, but only if you use a genuine bonding primer and degrease obsessively — and it's still the number one reason cabinets chip at handles and edges.
A scuff sand isn't refinishing. It's ten to thirty minutes with 150–220 grit, just enough to dull the shine so primer has teeth. That half hour is the cheapest insurance in the entire project. Do it.
What you'll need
- Degreaser (TSP substitute or a strong kitchen degreaser) and rags
- 150 and 220-grit sandpaper, plus a sanding sponge for profiles
- Bonding primer — a shellac-based or dedicated bonding primer, not standard wall primer
- Cabinet-grade enamel — waterborne alkyd or acrylic enamel made for trim and cabinets. Wall paint will never harden enough for doors that get handled daily.
- A 2-inch angled brush and a 4-inch foam roller (foam leaves the least texture)
- Screwdriver, labels or plastic bags, painter's tape
The sequence that works
 Save
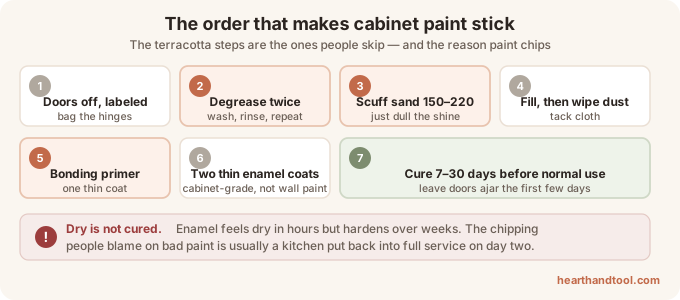
Save- Remove the doors and drawer fronts. Painting them in place guarantees drips and a sticky hinge line. Number each door and put its hinges and screws in a labeled bag — this saves an hour of confusion at reassembly.
- Degrease everything twice. The area around the stove and the pulls hold grease you cannot see. Wash, rinse with clean water, and let dry. Then do it again. This is the step that decides whether the paint holds.
- Scuff sand all surfaces to a uniform dull finish. Vacuum, then wipe with a tack cloth or a barely damp cloth.
- Fill and repair dents or old hardware holes with wood filler; sand flush when dry.
- Prime one thin coat. Brush the profiles first, then roll the flats. Thin coats — primer's job is adhesion, not coverage. Sand very lightly with 220 once dry.
- Two thin coats of enamel, following the same brush-then-roll order, with the manufacturer's full recoat time between them. Two thin coats beat one thick coat every single time: thick enamel stays soft for weeks and prints fingerprints.
- Reassemble carefully and, if you're changing hardware, drill new holes with a template so every pull lines up.
 Save
SaveThe rule almost everyone breaks: dry is not cured
Enamel feels dry in a few hours. It reaches full hardness — cure — in anywhere from 7 to 30 days depending on the product and humidity.
During that window, treat the cabinets gently: no slamming, no stacking heavy dishes against painted shelf surfaces, and if you can, leave doors slightly ajar for the first few days so freshly painted edges don't stick to the frames and tear when opened. The chipping people blame on "bad paint" is very often a kitchen put back into full service on day two.
Spray or brush?
A sprayer gives a factory-smooth finish and is worth renting (about $50–80/day for an HVLP) if you're doing a whole kitchen and can set up a spray area in a garage. But it demands serious masking and practice.
Brush and foam roller, done in thin coats with a self-leveling enamel, gets you 90% of the way there with none of the setup. For a first cabinet project, that's the right trade.
 Save
SaveWhat to expect when you're done
A well-prepped, properly cured cabinet paint job holds up for 8–10 years with normal kitchen use, with touch-ups at the handles somewhere along the way. Keep the leftover quart labeled — those touch-ups are five minutes each if you have the exact paint, and a whole-door repaint if you don't.
Deciding on the color first? The color drenching guide explains how the same color behaves on cabinets, walls and trim, and the paint calculator will size the order (measure door faces as wall area).