 Save
SaveFreshly painted trim is what separates a room that looks repainted from a room that looks renovated. It's also where beginners lose their nerve, because brush marks show on trim in a way they never do on a wall.
Good news: the technique is three habits, and the product choice does half the work for you.
Paint it last, and here's why
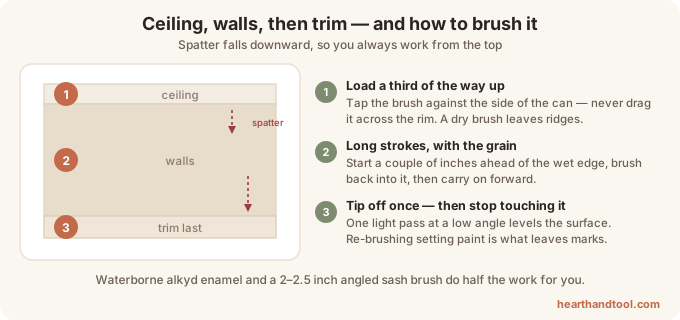
The professional order is ceiling → walls → trim, and it isn't arbitrary. Ceilings spatter onto walls, walls spatter onto trim, and trim is the fussiest surface — you don't want to redo it because of a roller mist from the wall you painted afterwards.
The exception: if you're doing an entire room including new trim, some painters do trim first and then cut the walls to it. For a normal repaint, keep the standard order.
 Save
SavePrep is 70% of the result
Trim collects things walls don't: hand grease at doors, dust on the top edges, scuffs at the baseboard.
- Wash it. Warm water with a little dish soap, then a rinse pass. Paint doesn't bond to hand oil.
- Scuff sand with 180–220 grit. You're dulling the sheen, not stripping. Every glossy old trim needs this or the new coat peels at the first knock.
- Fill nail holes and dents with lightweight filler, sand flush when dry.
- Caulk the gaps where trim meets wall. This is the step that makes trim look installed rather than nailed on — a thin bead erases every shadow line. Our caulking guide covers the technique.
- Vacuum and wipe. Dust in wet enamel is permanent.
The product choice that prevents brush marks
Use a waterborne alkyd enamel made for trim and doors, not wall paint. It's formulated to level itself — the brush ridges sink and flatten as it dries — and it hardens far more than a wall paint ever will.
Your brush matters just as much: a 2 to 2.5-inch angled sash brush with synthetic bristles. A cheap brush leaves tracks no technique can fix.
 Save
SaveTechnique: three habits
Load the brush a third of the way up the bristles and tap it against the side of the can rather than dragging it across the rim. A dry brush drags and leaves ridges; an overloaded one runs.
Work in long strokes, following the grain. Start a couple of inches from the wet edge, brush back into it, then continue forward. On a door panel: panels first, then the horizontal rails, then the vertical stiles.
Tip off, then stop touching it. After you've spread the paint, pass over it once with a nearly dry brush at a low angle to level the surface — then walk away. Re-brushing paint that has started to set is the single biggest cause of visible marks, because you're dragging through a skin that has already begun to level.
Tape or freehand?
Freehand cutting with a good angled brush is faster and gives a crisper line once you can do it — but it takes practice.
If you tape: press the edge down firmly with a putty knife, and use the painter's trick of running a thin bead of caulk or a light coat of the wall color along the tape edge first. It seals the gap, so the trim color can't bleed under.
Pull tape while the paint is still slightly soft, at a shallow angle back on itself. Waiting until it's fully hard tears the fresh paint.
 Save
SaveDoors: flat if you can
If you can lift the door off its hinges and lay it flat on sawhorses, do it — gravity stops runs before they start, and you can paint both faces in a session. Mark the hinge positions, and see our door repair guide if the hinges are loose while you have it off.
Painting in place is fine too; just check for runs every few minutes on vertical surfaces during the first half hour.
Two coats, and then patience
Two thin coats always beat one thick one. Follow the recoat time on the can — usually 4 to 6 hours for waterborne enamel.
Then the rule people break: dry is not cured. The enamel keeps hardening for one to three weeks. Don't stack anything against fresh baseboards, and leave doors slightly open for the first few days so the edges don't stick to the frame and tear. Same warning as painting cabinets — and the same disappointment when it's ignored.
How much you'll need
Trim uses far less than you think: a quart typically covers the trim of an average room, two coats. Doors take about a quarter of a quart per side. Use the paint calculator for the walls and just add a quart for the woodwork.